


2026 Latest Detailed Guide to Dropshipping Operations
Table of Contents
What is dropshipping?

Drop shipping is a retail logistics model that allows you to sell products without holding inventory. This means your business primarily acts as an online store, showcasing products stored and shipped directly by manufacturers or suppliers. When a customer places an order, you purchase the product from the supplier, who then handles the shipping directly to the customer. In today's highly competitive global market, the quality of logistics services directly impacts a company's operational efficiency and customer satisfaction. As a leading professional logistics service provider, ChinaDivision is committed to providing clients with systematic and efficient order fulfillment services. To help users complete their dropshipping business more efficiently using ChinaDivision, we offer two order placement modes: employee ordering and customer self-service ordering. In addition, we provide professional order-related Q&A and solutions, promptly and accurately answering customer questions and resolving issues to ensure reliable support throughout the entire logistics process.
Order business process
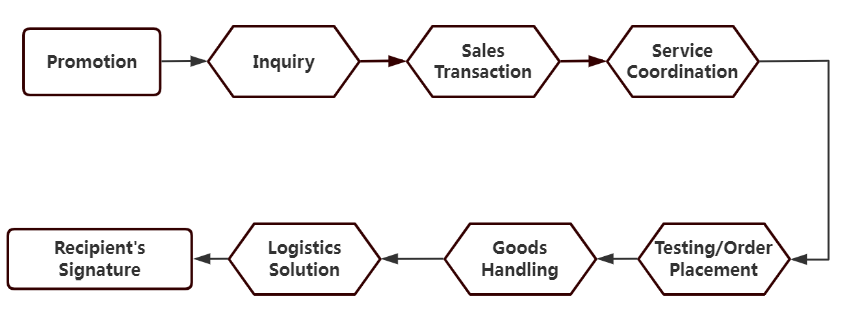
Processes at each stage
Sales Department: Confirming completed transactions, determining customer levels, and developing logistics plans.
Customer Service Department: Maintaining customer relationships, confirming information, and synchronizing information (including pre-sales, sales, and after-sales).
Order Group: Determining order fulfillment targets, managing inventory, managing accounts, and managing order fulfillment requests.
- SKU setup, inventory management, order management, deduction management, recharge management, order tracking management, and handling of daily shipping issues, including issues related to orders before they are "pending shipment";
- Timeliness of freight and miscellaneous fee deductions; miscellaneous fee deductions must be completed within 48-72 hours of the finance department's notification, except for cases where the customer has not recharged or cannot be contacted.
Warehousing and Distribution Department: Sorting, weighing, and packing within the warehouse, shipping according to channel, and dispatching goods.
Logistics Department: Tracking the transportation process and ensuring successful delivery.
Ordering process through the ChinaDivision
Staff ordering process
The Order Management System (OMS) is a digital tool used in e-commerce to track sales, orders, inventory, and fulfillment. It streamlines the order processing cycle from order receipt to delivery, ensuring accuracy and efficiency. A Transportation Management System (TMS) manages issues related to order transportation, allowing for tracking of logistics and delivery times. A Financial Management System (FMS) is where staff manage customer account details, handling order claims, order deductions, and other operations. When a customer chooses our staff to place an order, they synchronize the customer's order information with the relevant systems, completing the order fulfillment service step by step.
<h3">Self-service ordering process
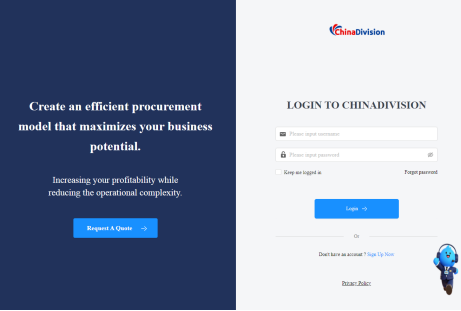
1、Register/Log in to your account
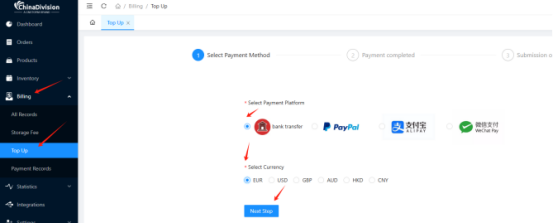
2、Top-up & Bill Inquiry
Operation Path: On the user center homepage, click the [Bills] module, then click [Top-up]. Select the corresponding payment platform and currency, and select [Next] to top up.
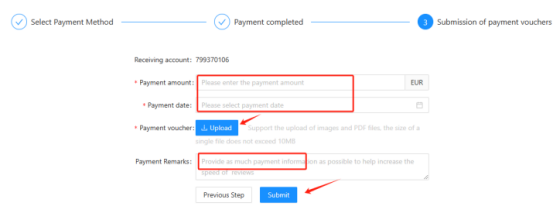
Complete the payment to the account shown below and keep the payment voucher. A photo/screenshot is acceptable, but the photo must be clear. After payment, click [I have completed payment] below.
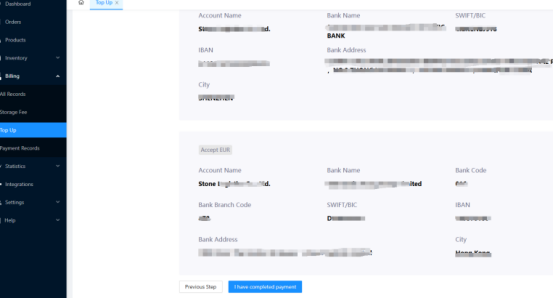
After filling in the payment information, click [Submit] to complete the top-up.
Note: Upload the payment screenshot saved in the previous step as proof of payment.
After the recharge is completed, the back-end finance department will usually review the payment information. Confirmation will only be made after the bank actually receives the funds. Due to different customer transfer banks, it normally takes 3-5 business days, and occasionally 5-10 business days. After our finance department confirms that everything is correct, the funds will generally be credited to the system within 1 business day.
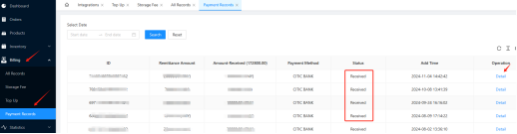
You can check the status as "Received" in the [Bill] module by clicking [Recharge Record], indicating that the recharge was successful.
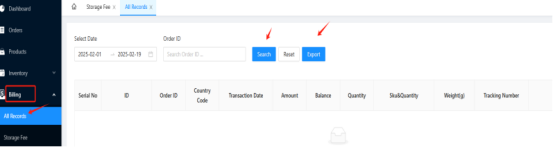
Bill Record Inquiry: On the user center homepage, click the [Bill] module, then click [Transaction Record] to search for the corresponding order number, or click [Export] for batch querying.
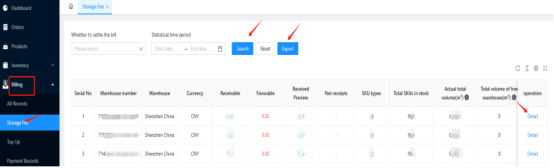
Storage Fee Inquiry: On the user center homepage, click the [Bills] module, then click [Storage Fees], specify the data to query the corresponding order number, or click [Export] for batch querying.
3、API and Plugin Operation Guide
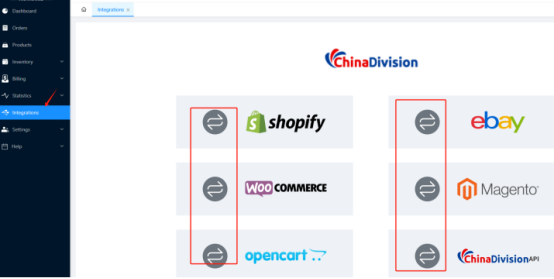
Operation Path: User Center Homepage, click the [Integration] module, and click the button to the left of your corresponding platform. The system will redirect you to the corresponding platform's integration guide webpage. Follow the detailed instructions within the link to complete the integration process.
4、Add and maintain SKUs
Adding SKUs Methods
Method 1: Manual Addition – This is suitable for situations where the number of SKUs is small. SKUs can be added one by one manually.
Method 2: Bulk Addition – This is suitable for situations where the number of SKUs is large. SKUs can be added in bulk by downloading the template and uploading the data.
Manual Add SKU
Operation Path: go to the User Center homepage , click on the [Products] module, click on [Add Product], enter the Add to Product List page. Follow the instructions on the page to fill in the product information, then click Confirm at the bottom to complete the SKU creation.
Note:
The UPC is similar to the product SN code and can be the same as the SKU number. Alternatively, you can click Apply ST-UPC to have the system automatically generate a UPC, which can be used as the SKU code.
If the user does not have an SKU, they can click Apply ST-UPC to have the system automatically generate a UPC code to serve as the SKU code.
Product Dimensions: Users can fill in the dimensions, but the final measurements will be based on the warehouse's receipt measurement.
Bulk Adding SKU
For cases where there are many SKUs or the user has an existing SKU catalog, you can fill out the SKU template and upload it in bulk to improve efficiency.
Operation Path:
Go to the User Center homepage, click on [Products]→ Click on [Download] to download the SKU template.
Fill out the SKU template according to the instructions, and after completing it, click [Upload] to upload the template.
Edit and Modify SKU Information
Operation Path:
Go to the User Center homepage → Click on Products → Search for the SKU using the corresponding SKU or product name → Click Edit.
After updating the SKU information, click Confirm to save the changes.
SKU Information
Operation Path:
Go to the User Center homepage, click on [Products], search for the SKU using the corresponding SKU or product name, click [Delete]. After confirming the deletion, click [Confirm] again to remove the SKU.
Note: Once deleted, the SKU cannot be recovered and will need to be added again. Please proceed with caution.
Printing SKU Labels
Operation Path: go to the User Center homepage, click on [Products] check or search for the corresponding SKU, click [Print SKU Labels]. After confirming the number of labels to print, click [Confirm]. This will redirect you to the print page. Click the printer icon in the top right corner to print, or click the download icon next to it to download or save the SKU labels.
5、Reservation and Inbound Inquiry Operations
Click on Inventory, click on [Receiveing] inbound orders, click on [Create Appointment] add new inbound reservation. Fill in the required fields (marked with*) accurately, and then proceed accordingly.
Click on [Add New Packing List], enter the packing information, click on [Add SKU], enter the SKU information, click [Save] to complete the process.
Click on [Receiving], select the desired data row, click on [Operation], in the dropdown menu, click [Submit] to finalize the operation.
After successfully creating the inbound order, you can download or print the carton labels: click on [Receiving], select the desired reservation data row, click the [Print Carton Mark] button. Once you enter the print page, click the printer icon in the top right corner to print. After printing, attach the labels to the corresponding outer boxes.
Download Carton Mark (Optional, Not Required): click on [Inventory]--[Receiving], select the desired reservation data row, click [Download Carton Marks], this will take you to the download carton label page. Click the download icon in the top right corner to save the file. Alternatively, during step 4 of the previous process [rint carton mark], you can also download the label by clicking the download icon in the top right corner of the print page.
View Created Inbound Records: Operation Path: click on [Inventory]--[Receiving], filter or search for the desired data row , click on [Details] to view the full inbound record.
Before Submitting the Inbound Order: click on [Inventory]--[Receiving], select the desired data row, click on [Operation], in the dropdown menu, click [Submit]/[Edit]/[delete] the reservation inbound order before it is submitted.
After Submitting the Inbound Order, click on [Inventory]--[Receiving], select the desired data row, click on [Operation], in the dropdown menu, click [Withdrawalt]. You can Withdrawalt the reservation inbound order if the status has not yet been "Submited". If the order has been. You can Withdrawalt the reservation inbound order if the status has not yet been "Submited", it cannot be withdrawalt, and you will need to contact our sales/customer service to cancel it.
Viewing Discrepancies Between Actual and Reserved Inbound Data: You can view discrepancies between the actual and reserved inbound data in [Inventory], click on [Receiving], then click on [Loss Order], [Confimed Order] are identified during inbound quality inspection, [Disputed order] are discovered during the shelving process.
Viewing Inventory Data: You can view the Inventory data in the [Inventory], click [All] check the historical inbound records for each SKU. Click on [details] to check history of inbound records. Click [Sold out] to view the list of SKUs that have a stock level of 0.
6、System - Order Creation
Method1.1.API Integration (Recommended)
You needs to log in to the order module daily, click on [Approving] orders, check the order from the right-side panel, and check the order information is correct, then click [Submit for shipment].
Method 2: Manually Create Orders
You can manually create individual orders by entering the necessary order details one by one.
Operation path: User center home page, click on [Orders]----[Click Orders], and then click on [Create an order]to start creat a new order.
When filling in the order address, fields marked with * are required. You can manually enter the address, or click [Automatic Identification] to automatically detect the recipient's address by copying and pasting it. If there are any issues with characters or formatting, make sure to check and correct them.
Enter the warehouse and SKU information, then click [Search]. All SKU details will appear. Afterward, add the quantity of SKUs to be shipped and click the [OK] button.
Note: The displayed logistics fee at this point is an estimated cost. The actual shipping fee will be based on the actual weight or volumetric weight, as calculated after packaging and shipment.
Operation Path: go to the User Center, click the [Orders] module, click [Create Order], first, click [Download Order Template].
Operation Path: go to the [Orders] page, then filter/search the corresponding order by specifying the data row. You can view the order status and shipping status. Click the [View] icon on the right side to check the order details. To track additional order statuses, click the [+] button below to add the ones you want to monitor. Customers should pay close attention to orders in the [Error] status every day. Error orders must be handled by the customer in the user system before proceeding to the next step in the order process.
Operation Path: go to the [Orders] module, enter the order list, click the [View] icon on the left to enter the order details page.
This feature is only available if the order status is still [Approving]. If the order status is already [Upload (Verifiing) ], you can contact our order team for modification or cancellation. If the status is [Upload], it cannot be canceled or edited. You can contact our order team to try intercepting the order, but success is not guaranteed.
How to track goods in a dropshipping business?
1、Through 17TRACK
- Open the 17TRACK website, and enter the tracking number in the navigation bar.
- Click on 【TRACK】to view the corresponding logistics tracking information.
Tips: If you encounter any of the following problems when making your query: The system prompts you to select the last-mile delivery service provider; A delay in updating the track on the query site. Please contact your customer service representative as soon as possible.
2、Through STONE3pl
- Open the STONE3pl website, enter the system order number (usually starting with S, such as S802............18) in the navigation bar under Tracking number.
- Click on 【INQUIRE】to view the corresponding logistics tracking information. We can see the specific parcel transportation status (including specific time nodes and corresponding nodes)
- Batch search is supported, but the number of batch search orders is ≤ 40
If you find a delay in updating the track on the query site. Please contact your customer service representative as soon as possible.
FAQs
1、How do I create an order? What should I do if I encounter any problems?
ChinaDivision has created a complete fulfillment integration/plugin. You can connect to our system via API, and your order information will be updated synchronously. If you do not synchronize your orders to the ChinaDivision system via API integration, you can create orders in the following ways: manual order creation and batch order creation. If orders are not received in our system promptly, please contact our sales/customer service.
2、How can I track my order?
We offer two ways to track order information: via 17TRACK and STONE3pl.
3、What payment methods do you accept?
ChinaDivision accepts credit cards, wire transfers, PayPal, and Alipay payments.

About the Author: Limi

Limi is a content marketing expert at ChinaDivision, helping businesses and e-commerce sellers navigate the complexities of international shipping by providing actionable tips and comprehensive guides on logistics, shipping, and cargo transportation.